
Cheat Engine Tutorial Guide (x64)
Description
Cheat Engine Tutorial Guide (x64)
Now let's take a look at the Cheat Engine Tutorial (x64).
Open Cheat Engine, selectHelpfrom the main menu, and then selectCheat Engine Tutorial .
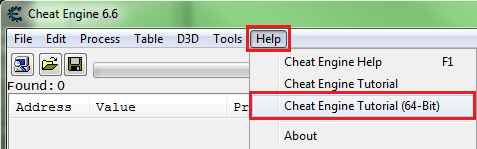
Then attach to the Cheat Engine Tutorial process and it will be 'Tutorial-x86_64.exe'.
Attach to the process If you're not sure how, see: How to Attach to a Process
Content
- Step 1: Welcome
- Step 2: Exact Value Scanning
- Step 3: Unknown initial value
- Step 4: Floating Points
- Step 5: Find the code
- Step 6: Pointers
- Step 7: Code Injection
- Step 8: Multilevel Pointers
- Step 9: Shared Code
- 10See also
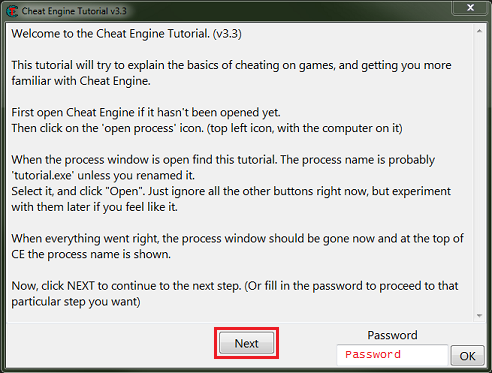
Step 1: Welcome
When the tutorial starts, you will see a screen like this. After reading the help text, you canclickon thebutton.
Save your password in case of a future crash (due to injection) or to restart later.
Step 2: Scanning for Accurate Values
You will see something similar to this in Step 2.
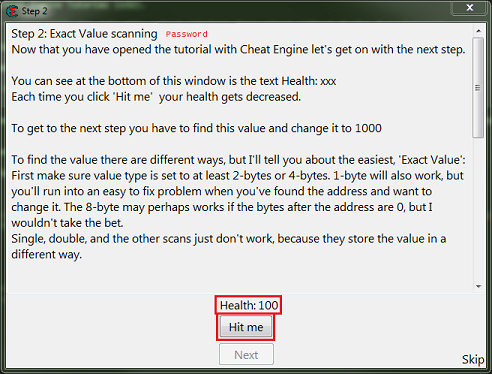
What we need to find is the health state, which in this case is an integer.
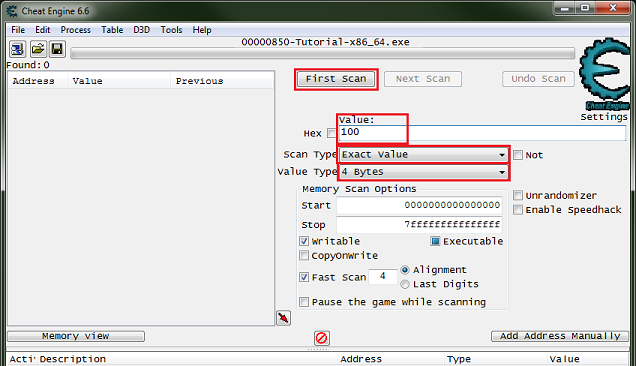
So to find the integer, we set up a memory scanner, scan for the exact value, and then set that value as the current state value. Most integers are stored in 4-byte variables, so let's start there.
Note: Integers can be stored in 1-byte variables (byte), 2-byte variables (int16/short), 4-byte variables (int32/int), and 8-byte variables (int64/long).
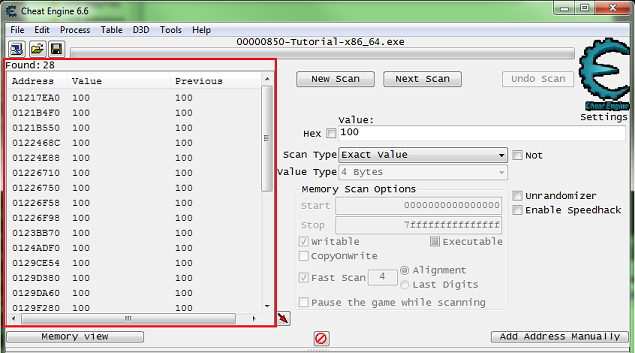
When you're ready, the first Click the Scanbutton .
In the list of found addresses, you will see a list of addresses like this.
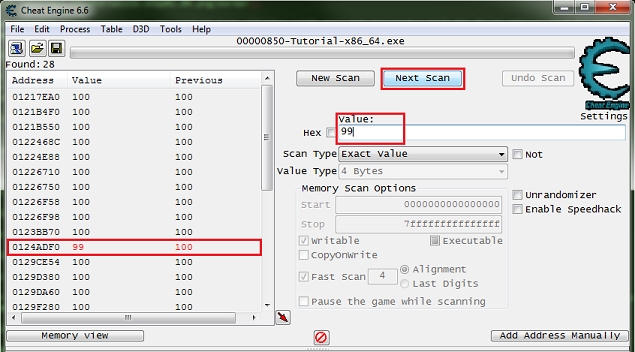
Now click on Hit Me button and enter the current values again and Clicknext Scanbutton .
Notice the red values in the list. This indicates that the value has changed.
After you click Next Scan, continue clicking 'Hit Me' again. You'll need to scan to make sure the list of addresses found is small enough to work with.

Double click an address in the found list to add it to the cheat table . Then change the value and freeze the address, double-click the value in the address list to edit it, and click the enabler/freeze box to freeze it.

The Next button should now be enabled. Click to go to the next step. If the Next button is not already active, click the hit me button again.
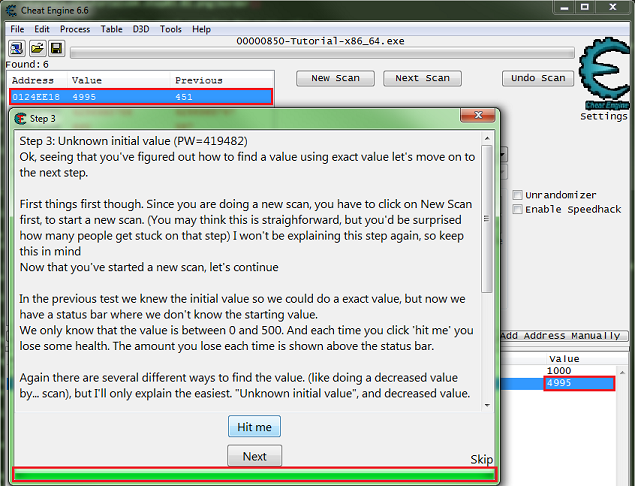
Step 3: Unknown Initial Values
When you start Step 3, you will see a form like this.
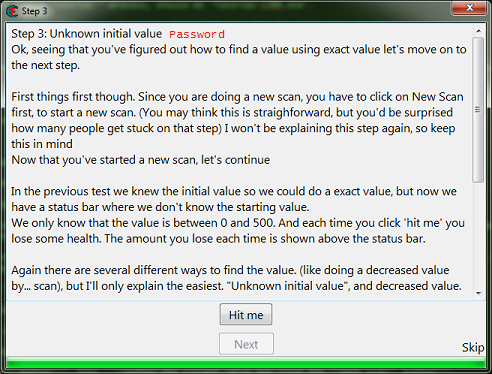
As the help text says, you mustclickthe New Scanbutton before starting this new scan.
This will clear the found results and start searching for new values.
Here we will continue to Hit Me It's a good idea to click the buttonto see how the values decrease, to help you decide which value type you should scan.
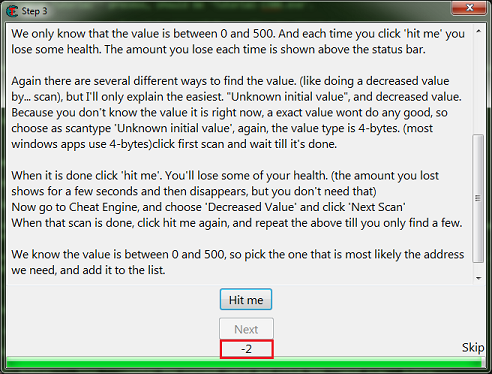
If the value is an integer , i.e., note that it has been decremented by a number and not a fraction.
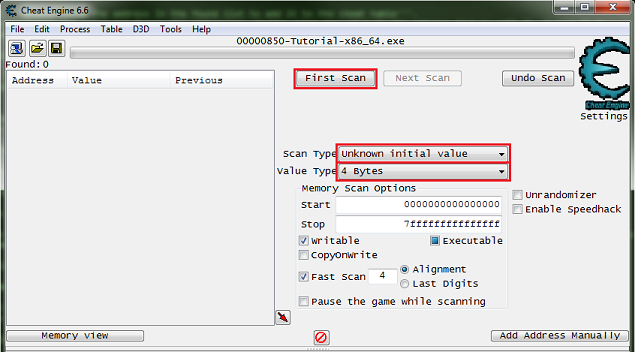
So let's set the scanner to4 bytesand an unknown initial value. Then click First Scan button .
Now Click 'Hit Me' button .
Then set Scan Type toReduced Value and click Overlapping Scan button .
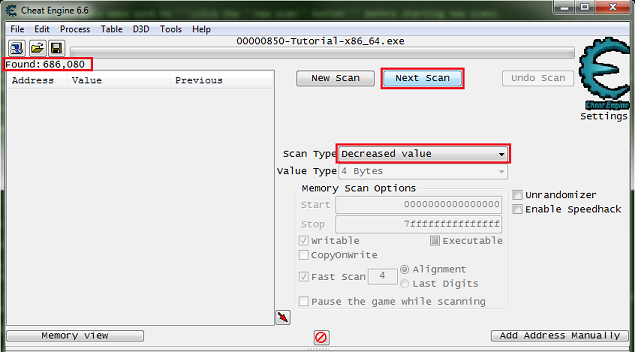
Notice the number of addresses found. In most games these days, this number may not be very high, but in most games the results found can be in the millions.
Now continue decreasing the value with the Hit Me button , and continue searching for the reduced value until the results you find are small enough to work with.
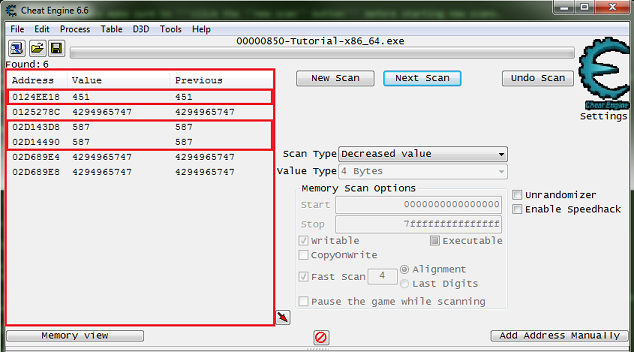
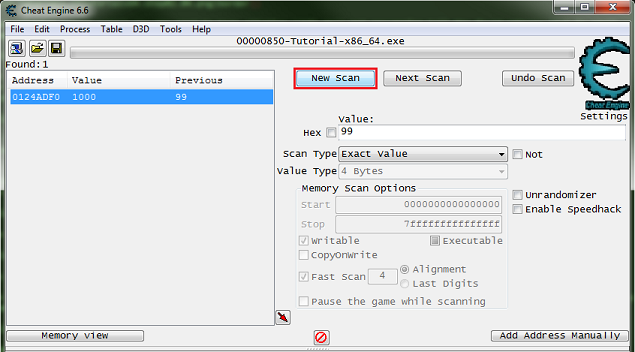
Now select the address and change the value to see if you get the desired effect. Here's how it works:
What I suggest here is to always write down the value before changing it (or pressCtrl+C ) or revert to the original value if it's not the correct value. This will prevent the game from corrupting your save file by changing a bunch of unknown addresses.
The Next button should be enabled as soon as you set the value to 5000. Changing the value and clicking the hitme button will populate the progress bar, but this is not necessary.
The Next button should now be enabled. Click to go to the next step. If the Next button is not already active, click the hit me button again.
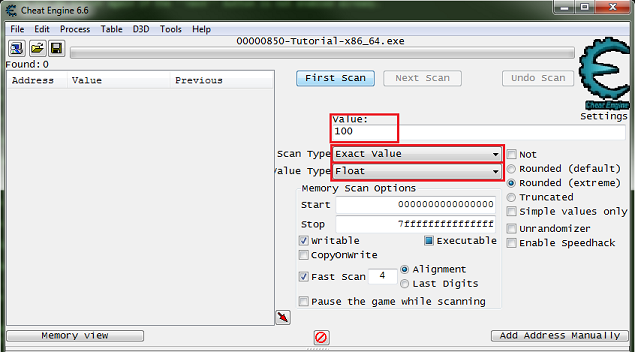
Step 4: Floating Points
When you start Step 4, you will see a form like this.
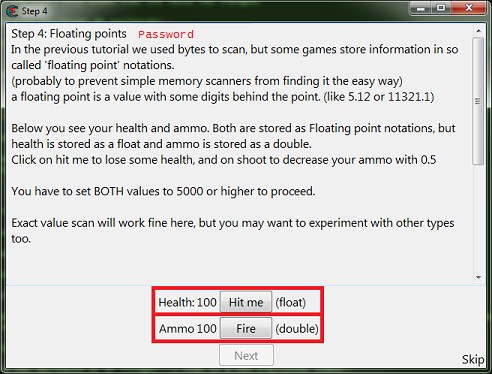
So click New Scan button . Then set the scanner tofloat , accurate values and enter your current health values .
Once set, click the First Scan button .
Like before, scan to find the health address and then add it to the address list .
Now, Click the New Scan buttonagain. Then set the scanner todoubleaccuratevalues and enter the current ammo values .
Once set, click the First Scanbutton .

Like before, scan to find the ammo address and then add it to the address list .
Now add the value If you change it to 5000the Next button will become active. Then click the Next button to proceed to the next step .
Step 5: Find the code
Once you start Step 5, you will see a form like this.
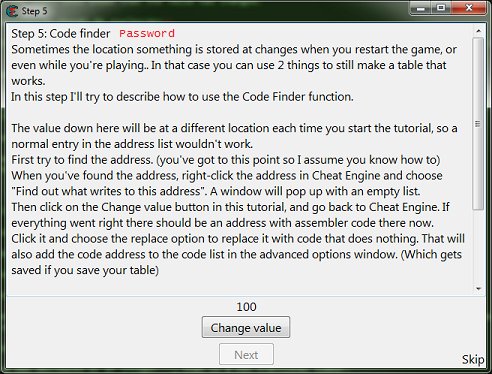
First find the value and then add it to the address list .
In case your debugger is not set up properly, the table and Save your password .
If you need help setting up the debugger, see: Debugger Options
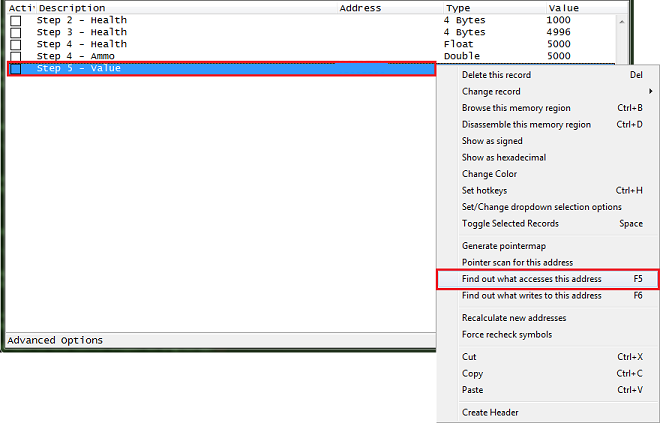
Right-click the address in the address list and select 'Find what accesses this address'. .
When Cheat Engine asks whether you want to attach the debugger, click the 'Yes' button. Click .

This will open the debugger form, now click Change Value button Clickingwill get the code displayed in the debugger form.
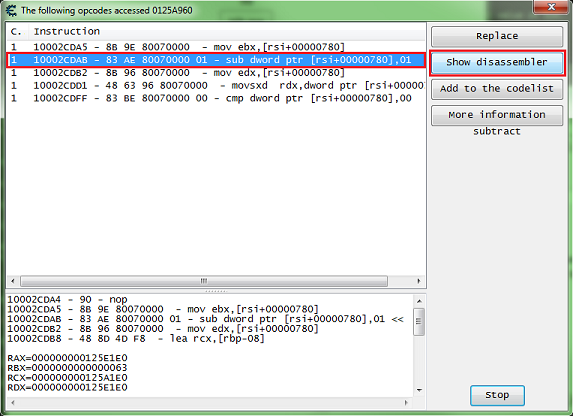
What we want is the write command. So you will find something like one of the following:
mov [**],** append [**],** child [**],** *** [**],**
Select the line of code for the write instruction and click on the Show Disassembler button to see the code in memory, then click on the Replace button .
Don't forget to clicktheStopbutton .
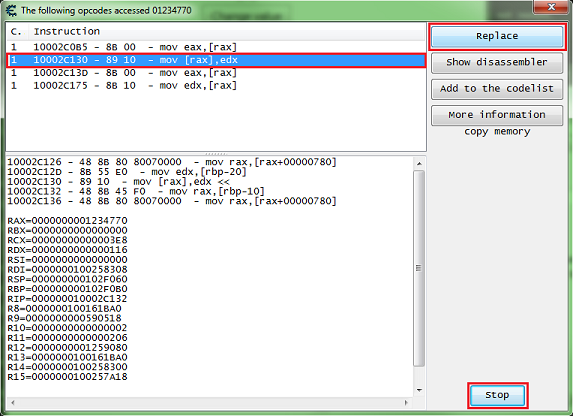
Clicking the Replace button replaces that line of code with NOP.
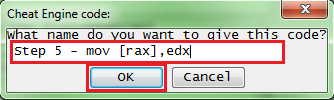
Cheat Engine will prompt you to enter a name for the item you want to add to the Advanced Options list.
Enter the name and Clickthe OK button .
Now Click the Change Value button again in the tutorial .
The Next button should become active, then click the Next button to proceed to the next step.
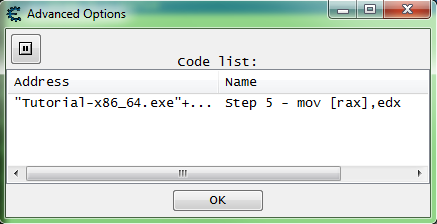
If an item in the Advanced Options list changes, it will be marked with red text.
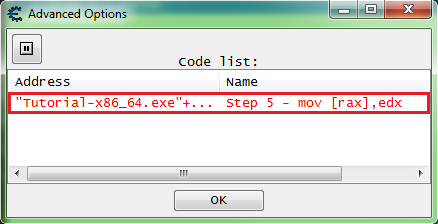
The list of advanced options can be viewed by clicking the Advanced Options button in the status bar at the bottom left of the Cheat Engine main form. .
To restore the original code of an item in the list, right-click on it and select Restore to Original Code .
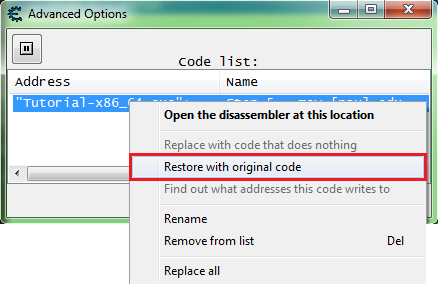
After restoration, the text will be black.
Step 6: Pointer
When you start step 6, you will see a form like this.
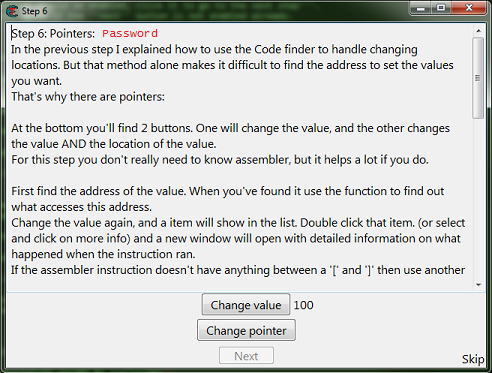
First find the value and then add it to the address list .
Right-click the address in the address list and then click ' SelectFind what accesses this address
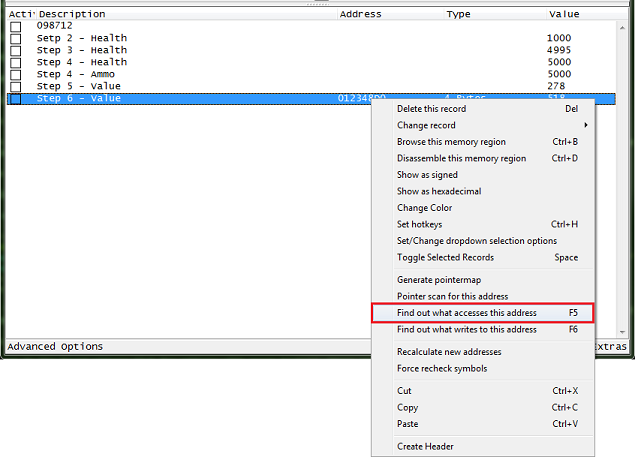
Then value Click the Changebutton to allow the process to access the address.
When choosing code to find the base address of a pointer, try to choose an instruction that does not write to the same register as the base address.
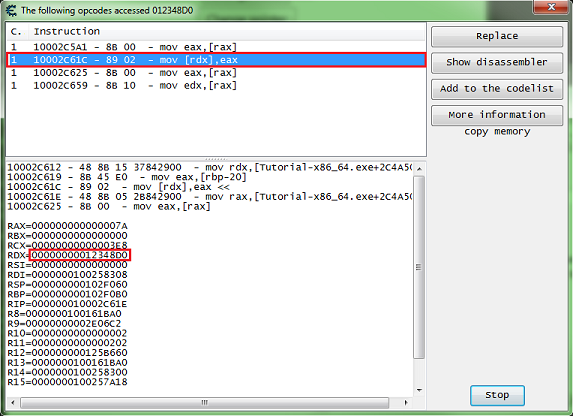
Our interest here is the value between the square brackets ('[' and ']'). So here we want the value of RDX.
Instructions
mov [rdx],eax
This means writing the contents of the EAX register to the memory address pointed to by the RDX register. We should choose this instruction because we are looking for someone to modify the contents of memory address 012348D0, which is stored in the RDX register.
The offset here is 0. All you have to do is have something like the following in your command:
mov [rdx+ 12C ],eax
Then the offset will be '12C' (0x12C). Note that this is a hexadecimal number.
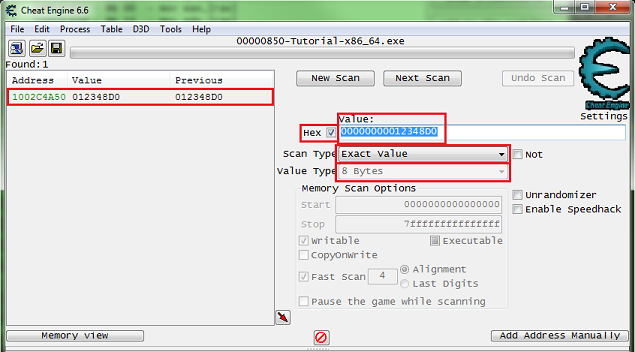
Now we want to find out what the pointer to the previously discovered address of interest 012348D0 is. Set the scanner to8 byte , check the Hexadecimal checkbox, then take the found value and put it as the value to scan.
When ready, press the First Scan button. Click .
Find the address with green letters in the list of found addresses . This is a static address.
Now we want to keep track of this pointer so that we can modify it to a new memory address whenever its contents change (i.e. it points to a different memory location). I do. Add the pointer you just found to the cheat tabledouble-clickthe addressof the memory record added to the address listand copy the address, then check the Pointer checkbox and paste the address in Pointer Base Address.
If you're not sure how to do this, see here: How to add an address to the address list
So my pointer should look like this.
["tutorial-x86_64.exe"+XXXXXX]+0
You should set it up like this. Don't forget to set the offset to the offset you found.
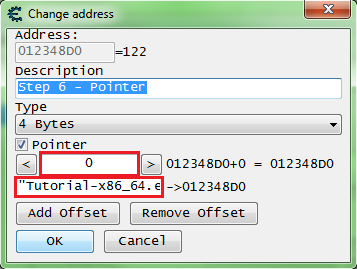
Once the pointer is set, Click on the OK button .
Now fix the value to 5000 and clickChange pointer buttonand the next button will become activated.
If the next button is not activated, select another address from the found list, and change the green value. Find the address and set it similar to the last address, then make sure it points to the correct value. If so, change the value, fix it, and then click the pointer Change button.
To proceed to the next step, click the Next button.
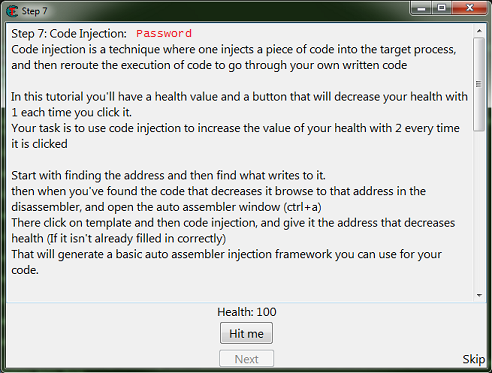
Step 7: Insert Code
Once you start Step 7, you will see a form like this.
Here we follow the same procedure as step 5, but instead of clicking Replace, we click the Show Disassembler button. Click .
This will open the disassembler view form at that instruction address.
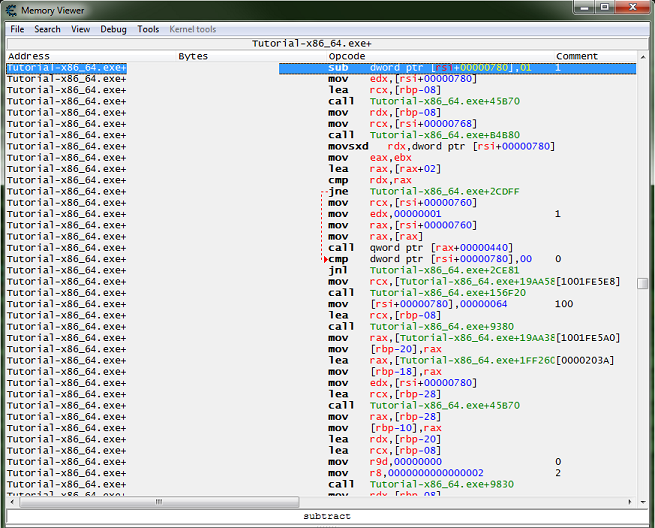
With an instruction selected, pressCrtl+A to open the Auto Assembler form. Open
From the Auto Assembler Form menu, select Template and then selectInject Full .
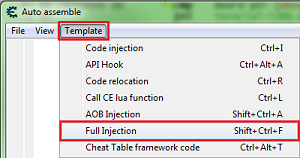
This will generate the script you need to get started.
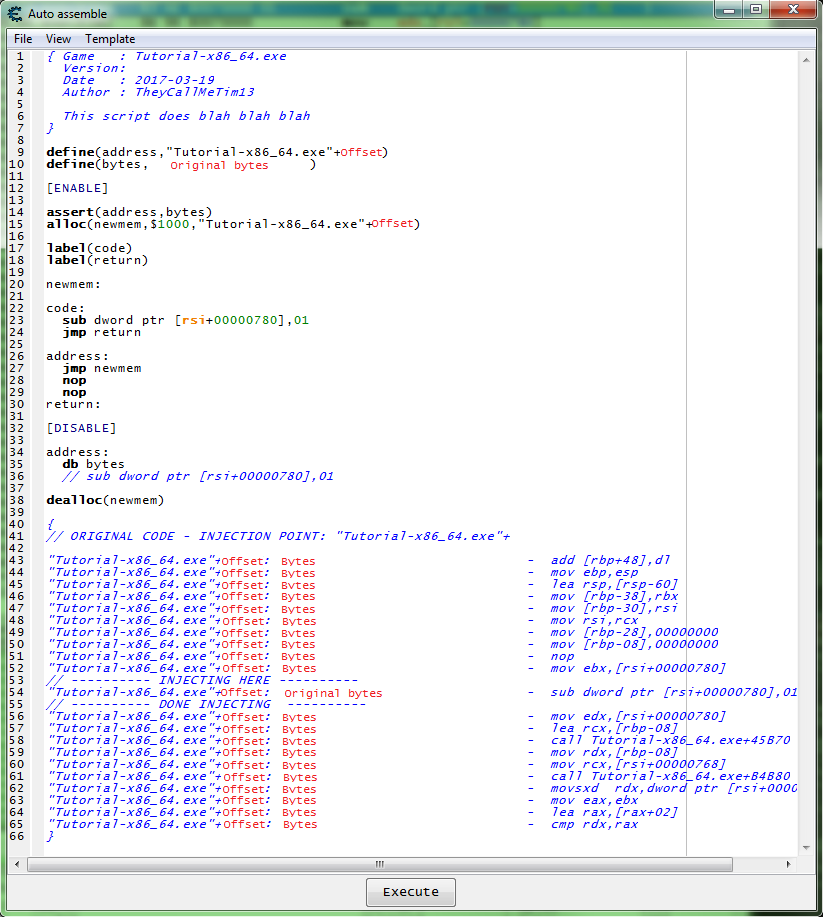
Now we need to add code that increases the value by 2 and then remove the original code that decreases the value .
To increase the value you can use INC or ADD .
So try something like this Let's see.
... newmem: add dword ptr [rsi + 780], code 2: //dword ptr [rsi+00000780],01 jmp return address: jmp newmem nop nop return: ...
Now add the script to your cheat table .
If you're not sure how, see here: How to add a script to a table
Then activate the scriptand clickon the Hit Me button .
This will activate the following button: Click the Next button to proceedto the next step.
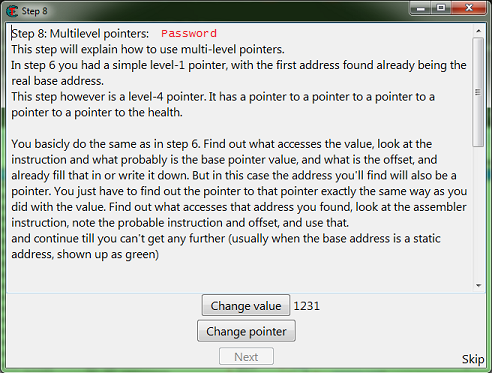
Step 8: Multi-Level Pointers
When you begin step 8, you will see a form like this.
Manual Repeat [ Edit ]
Here you follow the same steps as step 6, but look at what accesses the base address you found and repeat this until you find the static base address.
Now, let's do this. Let me show you the first debugger output.
10002D8D1 - B9 A00F0000 - mov ecx,00000FA0 10002D8D6 - E8 3522FEFF - Call Tutorial-x86_64.exe+XXXXXX 10002D8DB - 89 46 18 - mov [rsi+18],eax <<<<<< 10002D8DE - 89 C2 - mov edx,eax 10002D8E0 - 48 8D 4D F8 - Lee rcx,[rbp-08] RAX=00000000000007F7 RBX=000000000125CD60 RCX=0000000000000FA0 RDX=00000000828087F3 RSI=0000000001287960 <<<<<< RDI=0000000100258308 RSP=000000000102F070 RBP=000000000102F0B0 RIP=000000010002D8DE R8=0000000100161BA0 R9=00000000008E06A0 R10=0000000000000002 R11=0000000000000206 R12=00000000012607C0 R13=0000000100161BA0 R14=0000000100258300 R15=0000000100257A18
I found a static base on the first scan of the base address, but I remember that it was a false base. So what we want here is a base address in the form 'process.exe+offset'. You could try one of the others that looks like 'module.dll+offset', but I'd say it will turn out to be a false pointer here. And yes, it is. Most modern games have a lot of false values and pointers.
And the debugger outputs at address holding 0000000001287960.
Call 10002D88B - E8 90961200 - Tutorial-x86_64.exe+XXXXXX 10002D890 - E9 65000000 - jmp tutorial-x86_64.exe+XXXXXX 10002D895 - 48 83 3E 00 - cmp qword ptr [rsi],00 <<<<<< 10002D899 - 74 5F - je Tutorial-x86_64.exe+XXXXXX 10002D89B - 48 8B 36 - Move rsi,[rsi] RAX=0000000000013117 RBX=000000000125CD60 RCX=000000000125CD60 Korean: RDX=0000000000003CE3 RSI=0000000002D6D540 <<<<<< RDI=0000000100258308 RSP=000000000102F070 RBP=000000000102F0B0 RIP=000000010002D899 R8=0000000100161BA0 R9=00000000008E06A0 R10=0000000000000002 R11=0000000000000206 R12=00000000012607C0 R13=0000000100161BA0 R14=0000000100258300 R15=0000000100257A18
And the debugger prints at the address holding 0000000002D6D540.
10002D845 - E8 D6961200 - Tutorial-x86_64.exe+XXXXXX call 10002D84A - E9 AB000000 - jmp tutorial-x86_64.exe+XXXXXX 10002D84F - 48 83 7E 18 00 - cmp qword pointer [rsi+18],00 <<<<<< 10002D854 - 0F84 A0000000 - je Tutorial-x86_64.exe+XXXXXX 10002D85A - 48 8B 76 18 - Move rsi,[rsi+18] RAX=00000000000166D2 RBX=000000000125CD60 RCX=000000000125CD60 RDX=000000000000302E RSI=0000000002D6CE40 <<<<<< RDI=0000000100258308 RSP=000000000102F070 RBP=000000000102F0B0 RIP=000000010002D854 R8=0000000100161BA0 R9=00000000008E06A0 R10=0000000000000002 R11=0000000000000206 R12=00000000012607C0 R13=0000000100161BA0 R14=0000000100258300 R15=0000000100257A18
And the debugger outputs at the address holding 0000000002D6CE40.
10002D800 - E8 1B971200 - Tutorial-x86_64.exe+XXXXXX call10002D805 - E9 F0000000 - jmp tutorial-x86_64.exe+XXXXXX 10002D80A - 48 83 7E 10 00 - cmp qword pointer [rsi+10],00 <<<<<< 10002D80F - 0F84 E5000000 - je Tutorial-x86_64.exe+XXXXXX 10002D815 - 48 8B 76 10 - mov rsi,[rsi+10] RAX=000000000000B567 RBX=000000000125CD60 RCX=000000000125CD60 RDX=00000000000050A1 RSI=000000000123F1C0 <<<<<< RDI=0000000100258308 RSP=000000000102F070 RBP=000000000102F0B0 RIP=000000010002D80F R8=0000000100161BA0 R9=00000000008E06A0 R10=0000000000000002 R11=0000000000000206 R12=00000000012607C0 R13=0000000100161BA0 R14=0000000100258300 R15=0000000100257A18
Now you can scan '000000000123F1C0' to find the static address, but in a real game you will have to keep searching until you find the static base.
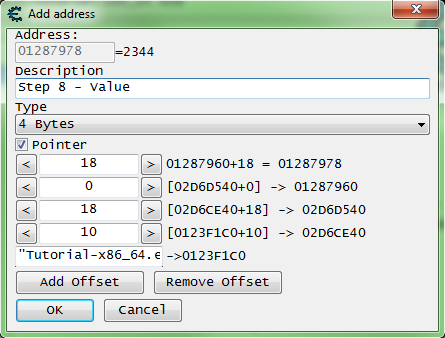
Based on this static address, the pointer will be:
[[[["tutorial-x86_64.exe"+XXXXXX]+10]+18]+0]+18
Pointer Scan
Pointer scan can be used to solve this quickly by first finding the address of the desired value, saving the generated pointer map, restarting the game, retrieving the address, saving another pointer map, and then comparing the two. More details can be found in Help_File:Pointer_scan.
Finally,
after finding the pointer, fix it at 5000 and thenchange the pointer Clickthe button . Once you have found the correct base, the Next button will become active after approximately 2 seconds. So, click Next button to moveto the next step.
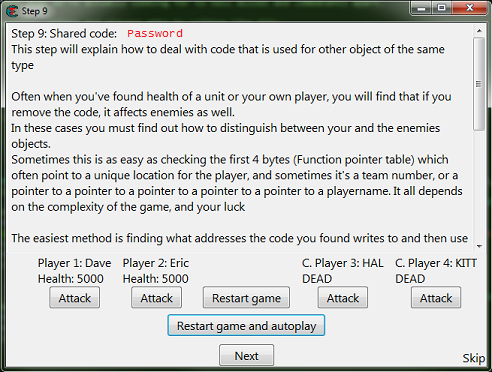
Step 9: Share Code
Once you start Step 9, you will see a form like this.
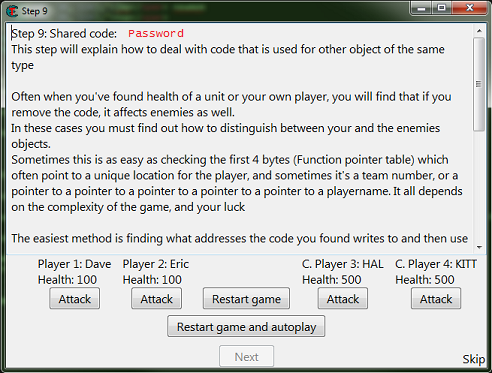
So, as the help text says, there is more than one kind of solution.
First you need to find one of the addresses and add it to the table .
If you have trouble finding the address, don't forget to try different value types and start a new scan.
Then I'd like to see what's accessing the address to find the function that writes to the actor's health, as in step 7.
If you want to try another method, Save the password. This is the final step of the tutorial.
So here it's good to understand what you're actually looking for to differentiate between allies and combatants.
When writing a game or engine, actors and players might be written this way.
//// Actor, the base class for all Actors Actor (object) { string Name = 'Actor' ; Coordinate Coord = new Coord( 0 , 0 , 0 ); float Health = 100.0 ; ... } //// Player class Player (Actor) { //// Player inherits from Actor. string Name = 'Player' ; int Team = 1 ; ... }
The team itself can be a structure. If it is declared as an object class, for example the 'Coords' variable, you will want to find a pointer to the actor's team structure.
So one way to solve this is to find the team ID or team structure in the player structure.
Find the team ID in the player structure
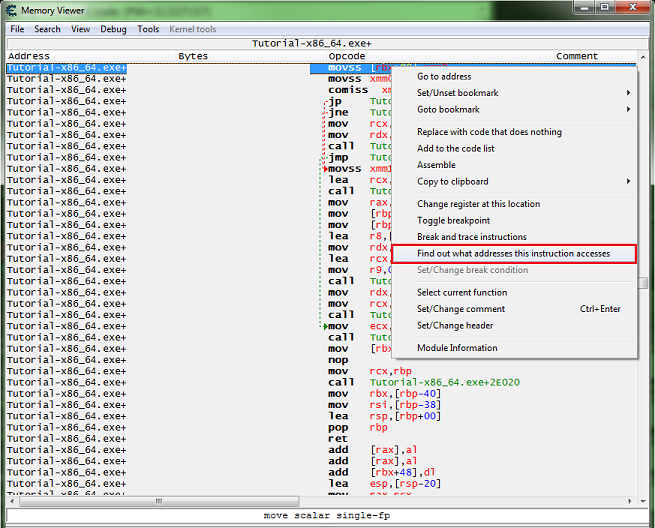
After finding the health-damaging function.
In the disassembler view form, right-click on the command and select ' Select 'Find addresses accessed by this instruction'
Then for all 4 values. Click theAttack button .
You must have all four addresses in the debugger list.
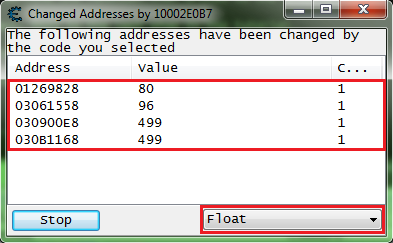
So go ahead and add it to your address list .
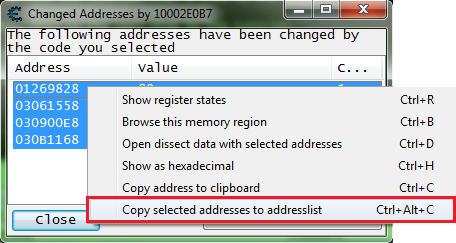
Then, let's open the analysis data structure form.

A few pop-ups will appear, and once you see them, you will see a form like this. Note that I had to expand the width of the form to move the columns.
Now my offset 0x10 was assumed to be a pointer that was 8 bytes wide on a 64-bit process. I saw that the pointer at 0x10 had a value that didn't look like a pointer.
So I had to change it to 4 bytes and add a new element, setting the offset to 0x14 and specifying a 4-byte value type. This is how it often works.

Here we can see that the team variable is at offset 0x14 of the struct.
Now: We need to add some injection code to the script, and then add code that checks the team variable in the structure to determine which actors are allies and which are combatants.
So we want something like this.
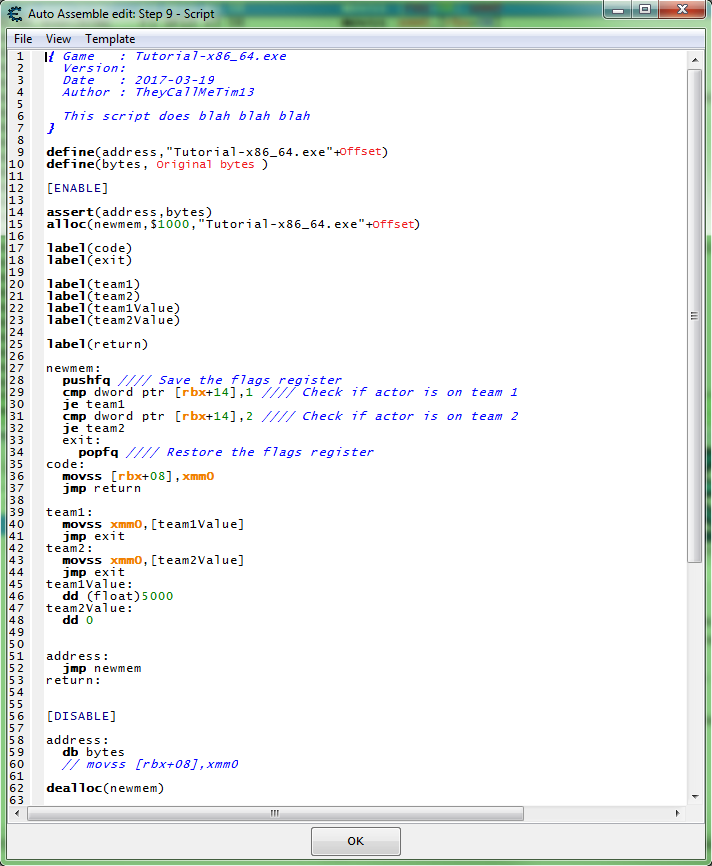
So when this script is activated, after jumping to the hook code when the game writes something like this to the actor's health, the following happens: Occurs.
- Save the RFLAGS register ( PUSH ). It's not strictly necessary, but it's good practice for comparison.
- Check if the actor is on team 1.
- If the actor is on team 1, set the new value to 5000 in float format.
- Check if the actor is on team 2.
- If the actor is on team 2, set the new value to 0 in hexadecimal format. (float 0 == int 0 == hex 0)
- Restore the RFLAGS register ( POP). This is absolutely necessary if the register PUSH
With this script enabled, clickRestart game and autorunbuttonand it will look like this. You can see the change.
Click the Next button to complete the tutorial. Complete it.
You will then see a form notifying you that you have completed the tutorial.
Find the differences in the registers
After you have found the health-damaging function.
In the disassembler view form, right-click on the instruction and select ' Find addresses accessed bythis instruction'. .
Then click Attackon all four values .
You should have all 4 addresses in your debugger list.
Now let's look at the register and see if there is a difference between allies and combatants. Let's take a look.
Select each address individually and pressCtrl+R.
Organize the form for easy comparison.
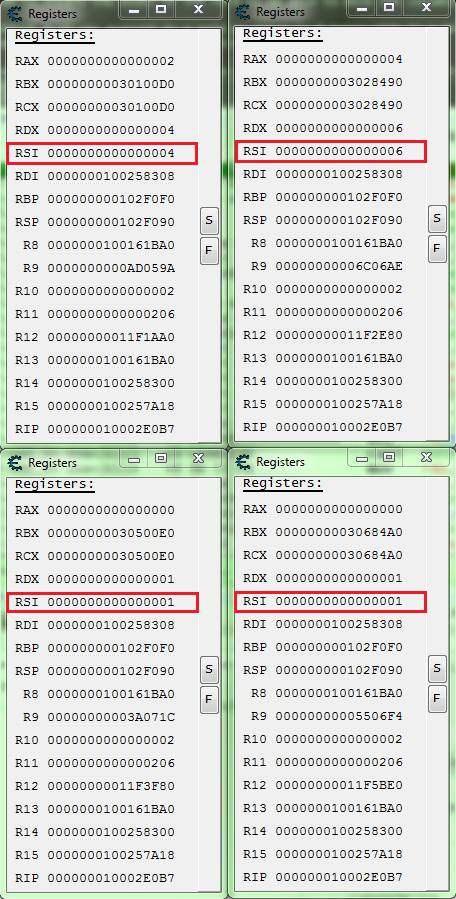
Here we can see that the combatant's RSI is 1.
So a script like this will work.
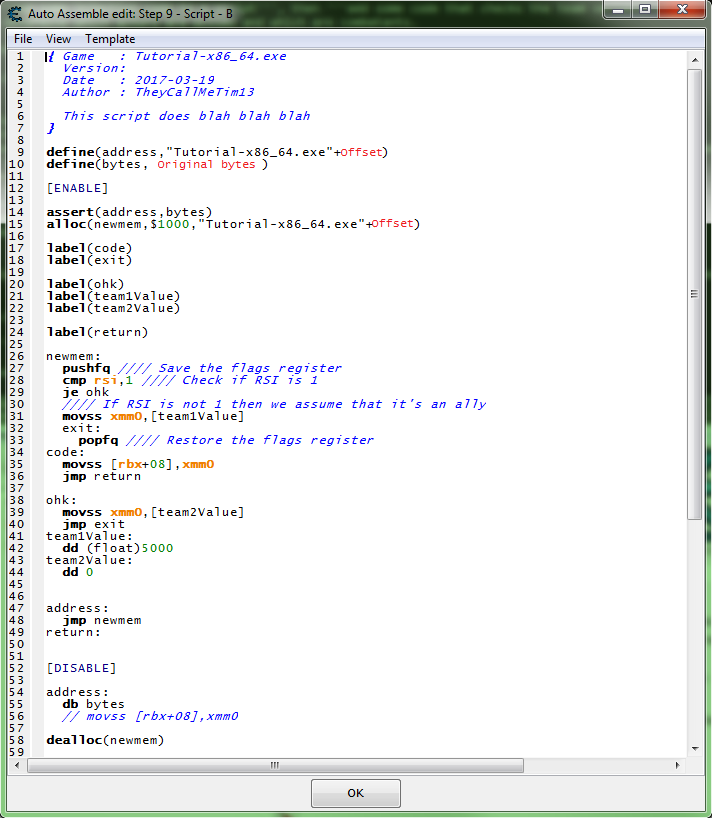
So, when this script is activated, the following happens after jumping to the hook code when the game writes something like this to the actor's health:
- Saving the RFLAGS register ( PUSH ). It's not strictly necessary, but it's good practice for comparison purposes.
- Make sure the RSI register is 1.
- If the RSI register is 1, set the new value to 0 in hexadecimal format. (float 0 == int 0 == hex 0)
- If the RSI register is not 1, we assume the actor is an ally, so we set the new value to 5000 in floating point format.
- Restore the RFLAGS register ( POP ). This is absolutely necessary if the register PUSH
With this script enabled, clickthe Restart Game and Autorun button and you will see it change shape like this. You can.
Click Next button to completethe tutorial.
Then A form will appear informing you that you have completed the tutorial.
Data source: https://wiki.cheatengine.org/index.php?title=Tutorials:Cheat_Engine_Tutorial_Guide_x64
FAQ
What game is "Cheat Engine Tutorial Guide (x64)" for?
"Cheat Engine Tutorial Guide (x64)" is a resource for 치트엔진 (MANUAL).
Comments (0)